As an Amazon Associate, we may earn a commission if you make a purchase — at no extra cost to you.
Window Cleaning Robot Streaks Problem How To Stop Streaks And Smears Fast
Tired of lines after a run? Fix the window cleaning robot streaks problem fast with pad, solution, and setup tweaks—then pick a model that stays streak free.
If your robot finishes and you see lines or smears, you’re not alone. This is a common window cleaning robot streaks problem and usually comes from fixable setup issues, not a faulty device. In most homes, a window cleaning robot leaves streaks due to dirty pads, unprepped glass, or the wrong cleaning solution. The good news is that simple changes—clean pads, the right mix, and a quick pre-wipe—often fix the issue on the very next run. This guide shows why window cleaning robot pads causing streaks is so common and how to prevent repeat smears easily.

Most people just slap the robot on the window and walk away, hoping for the best. That rarely works out. These gadgets need some regular care and the right setup if you want truly streak-free results. Once you treat it like a quick setup routine, the window cleaning robot streaks problem becomes easy to prevent.
This guide breaks down why window cleaning robots leave streaks and what you can actually do about it. The content creation industry keeps booming, but when it comes to smart home tech, real-world tips beat flashy marketing every time. Here, you’ll find advice on prepping your windows, keeping your robot in shape, dodging rookie mistakes, and choosing a model that fits your home.
Quick Answer: Window Cleaning Robot Streaks Fix
- Streaks usually come from dirty pads, using the wrong amount of cleaner, or not prepping the glass first
- Cleaning pads regularly and setting up the robot right will prevent most streak issues
- Not all windows are robot-friendly, and even the best models have some quirks
If you want a fast win, solve the window cleaning robot streaks problem by starting with clean pads and a lighter solution mix.
Why the window cleaning robot streaks problem happens
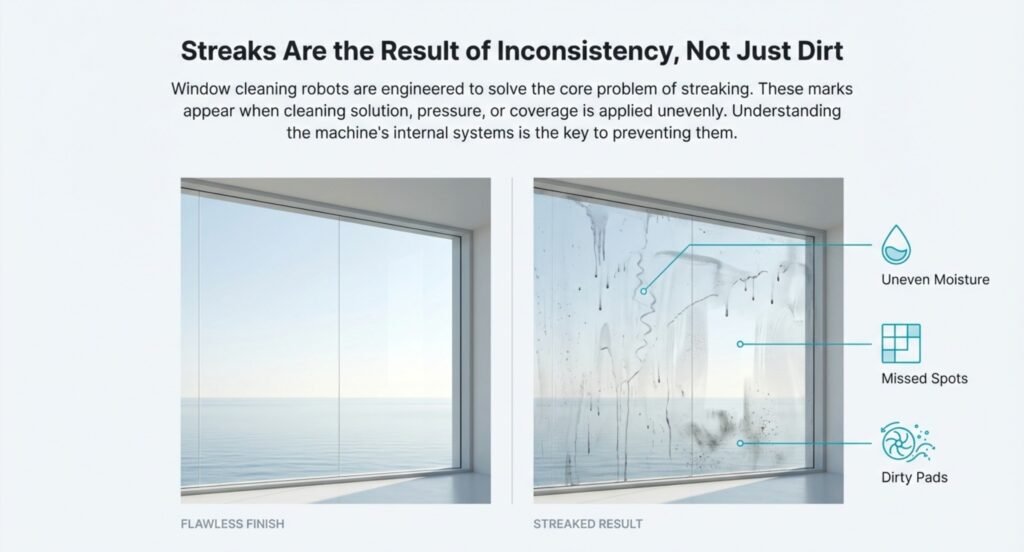
Window cleaning robots promise streak-free glass, but the window cleaning robot streaks problem shows up when residue dries unevenly or the pads spread dirty moisture. The goal is to save time and get pro-level results—without breaking a sweat or climbing a ladder.
What Causes a window cleaning robot to leave streaks on glass

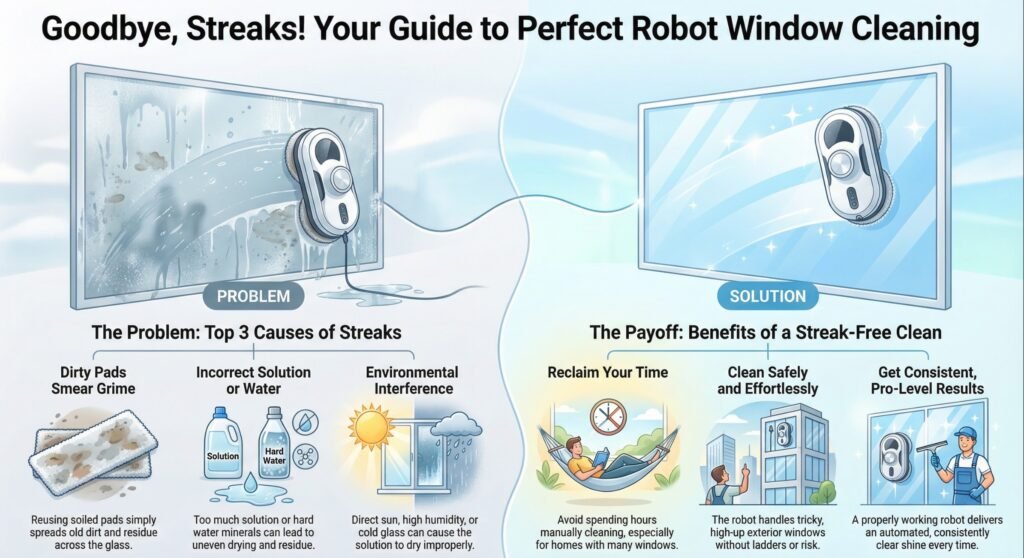
Streaks happen when the cleaning solution dries unevenly or the robot’s pads leave stuff behind. Honestly, it’s not that different from what happens if you use too much cleaner or wipe in weird directions by hand. Robots just add their own issues, like how wet the pads get and how they move across the window. That mix of moisture + movement is why the window cleaning robot streaks problem can look worse on sunny windows or glass with light dust.
Main reasons? Dirty pads, too much (or not enough) cleaning solution, and bad edge detection. If your pads are full of dirt from last time, they’ll just smear grime around. And if your water is hard, you’ll get those chalky white streaks from minerals.
Temperature matters, too. Cold glass makes the solution dry too fast. Humid days slow everything down. Direct sun? That’s the worst—stuff dries in weird patterns and streaks get locked in.
How Fixing Window Cleaning Robot Streaks Saves Time and Effort
Cleaning windows by hand means dragging out ladders, squeegees, and spending way too much time—especially if you’ve got a two-story house. Most folks spend half an hour or more just on the outside. Smart home gadgets are supposed to make life easier, and window robots are no different—they do the scrubbing and wiping for you.
These robots can handle tricky outside windows without you risking a fall. They stick to the glass with suction or magnets and follow programmed cleaning patterns.
If you’ve got a lot of windows, the time savings are real. You can run the robot on different windows over the week and skip spending your whole Saturday cleaning. Plus, your arms won’t be sore from all that scrubbing.
Quick Checklist to Fix Window Cleaning Robot Streaks Fast
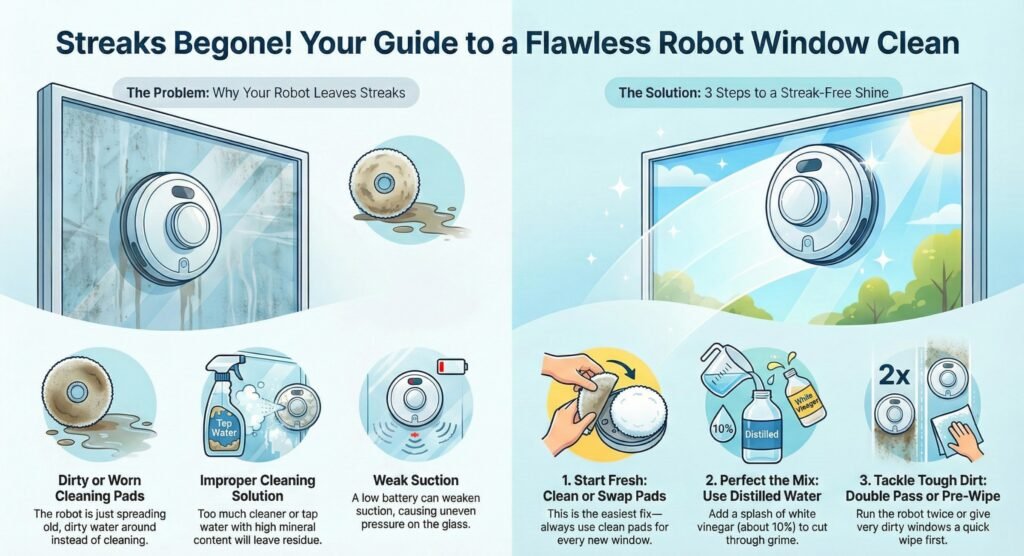
Window cleaning robots leave streaks if you use too much cleaner, have dirty pads, or if the robot isn’t making solid contact with the glass. Usually, it’s just spreading dirty water around instead of actually cleaning it up. Treat this as the fastest way to fix the window cleaning robot streaks problem before you change anything else.
Fixing the window cleaning robot streaks problem starts with clean pads, lighter solution, and proper setup.
Most common causes:
- Dirty or worn cleaning pads
- Too much solution, or the wrong kind
- Low battery (so suction gets weak)
- Windows that needed a quick wipe first
- Mineral buildup from hard water
Quick fixes that work:
The easiest fix? Clean or swap out the pads before every use. People skip this step all the time, then wonder why the robot made things worse.
Use distilled water instead of tap to avoid those mineral streaks. A splash of white vinegar (about 10% of your mix) helps cut through residue and won’t leave marks.
If the streaks are stubborn, run the robot over the same spot twice. The first pass loosens up the dirt, and the second one actually gets rid of it.
When streaks won’t go away:
Sometimes, you just need to wipe the window by hand before using the robot. Stuff like bird poop or sticky gunk will just smear around otherwise. A quick wipe with a damp cloth usually does the trick.
Also, make sure the robot’s suction stays strong the whole time. If it gets weak, the pads won’t press evenly on the glass, and you’ll get streaks.
How Window Cleaning Robots Work and Why Streaks Appear
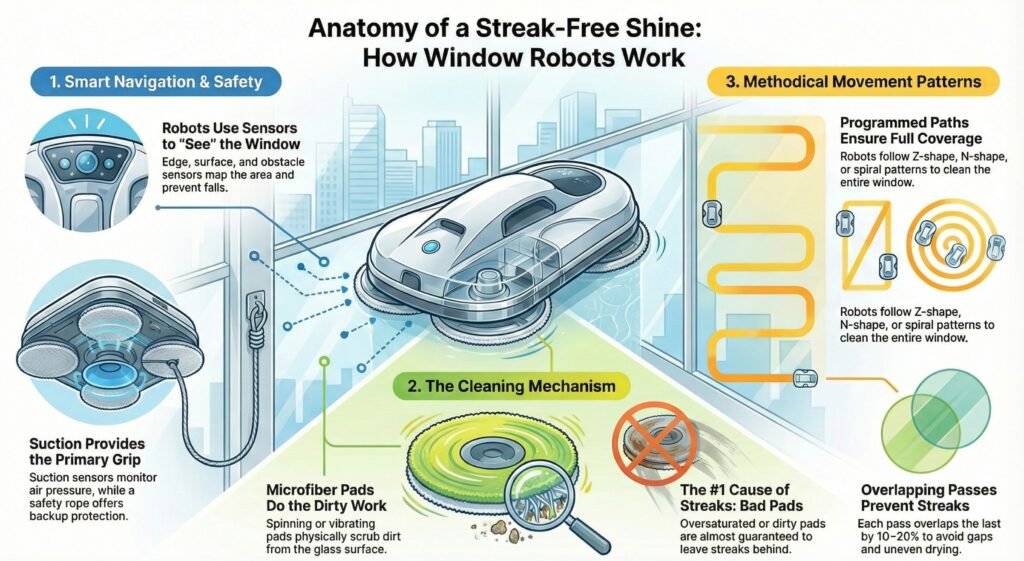

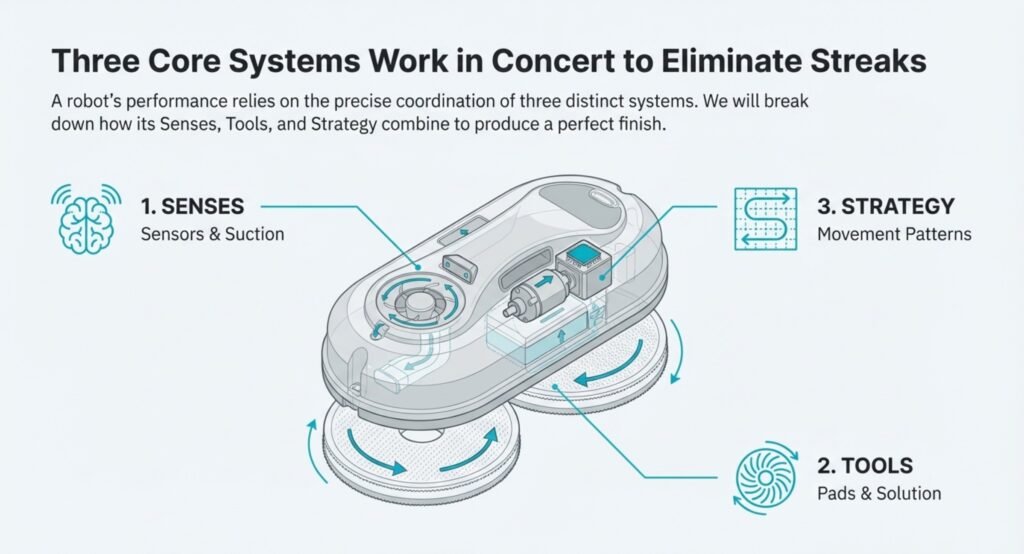
Window cleaning robots rely on three main things: sensors to keep them safe, pads that scrub away dirt, and programmed patterns to make sure they don’t miss spots.
How Sensors and Suction Affect Window Cleaning Robot Streaks
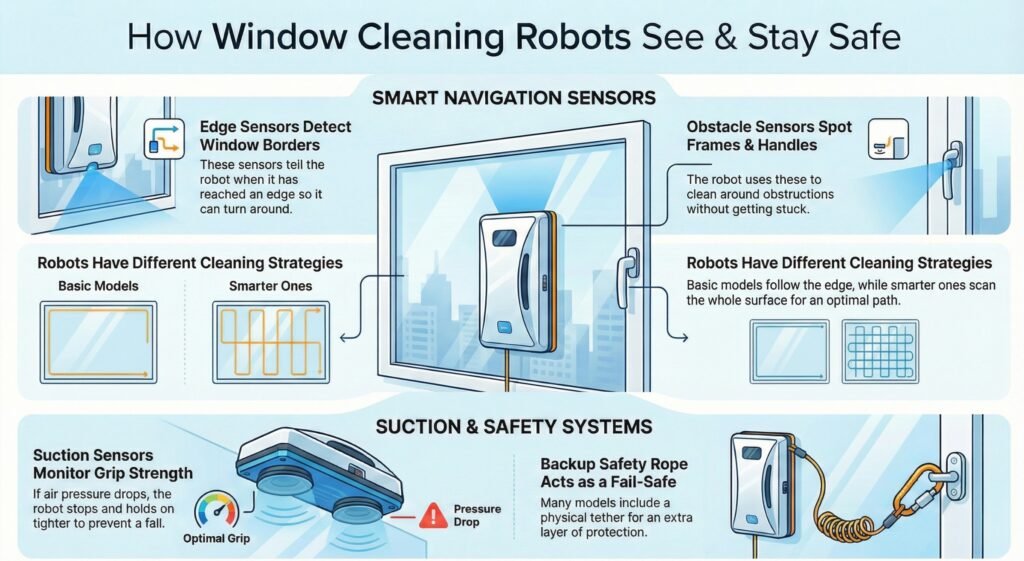
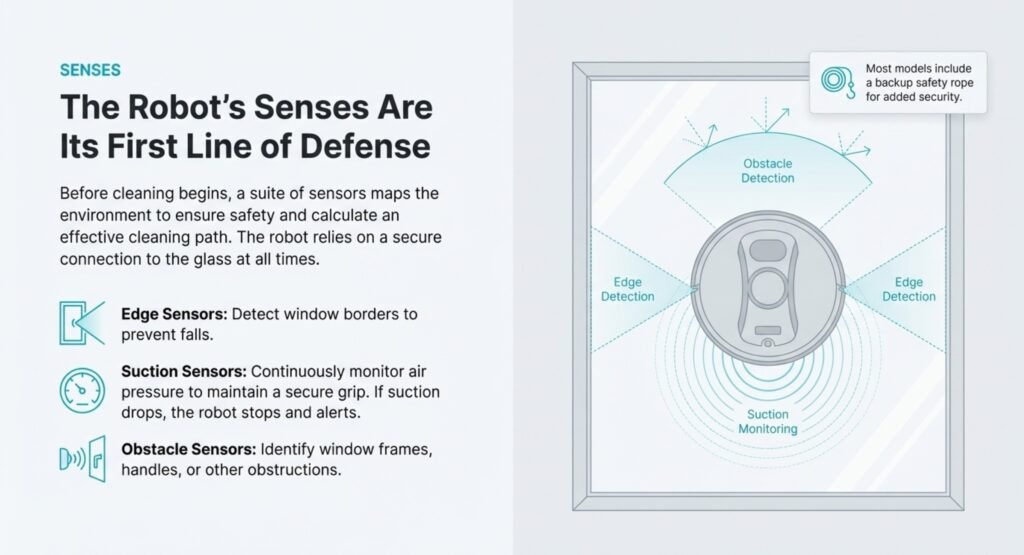
These robots use a bunch of sensors to find the edges of your windows and avoid falling off. Most have edge sensors that notice when they hit the border, so they can turn around in time.
Main sensor types:
- Edge sensors – Find the window’s edge
- Surface sensors – Watch suction strength
- Obstacle sensors – Spot window frames or handles
Suction sensors keep an eye on air pressure. If suction drops, the robot stops and grabs on tighter. Many models also have a backup safety rope, just in case.
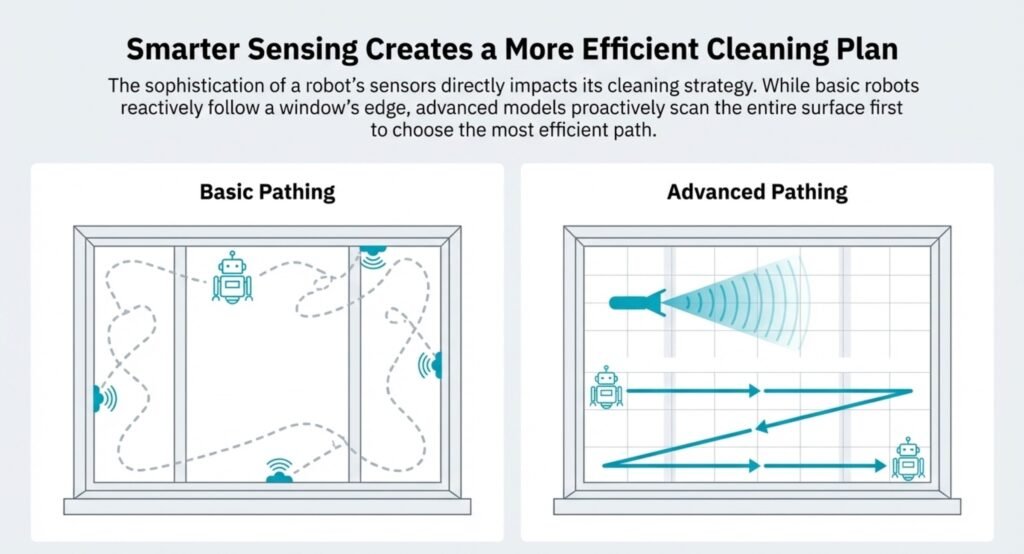
Basic robots just follow the window’s edge first. Smarter ones scan the whole surface before picking the best cleaning path.
How Window Cleaning Robot Pads and Solution Cause Streaks

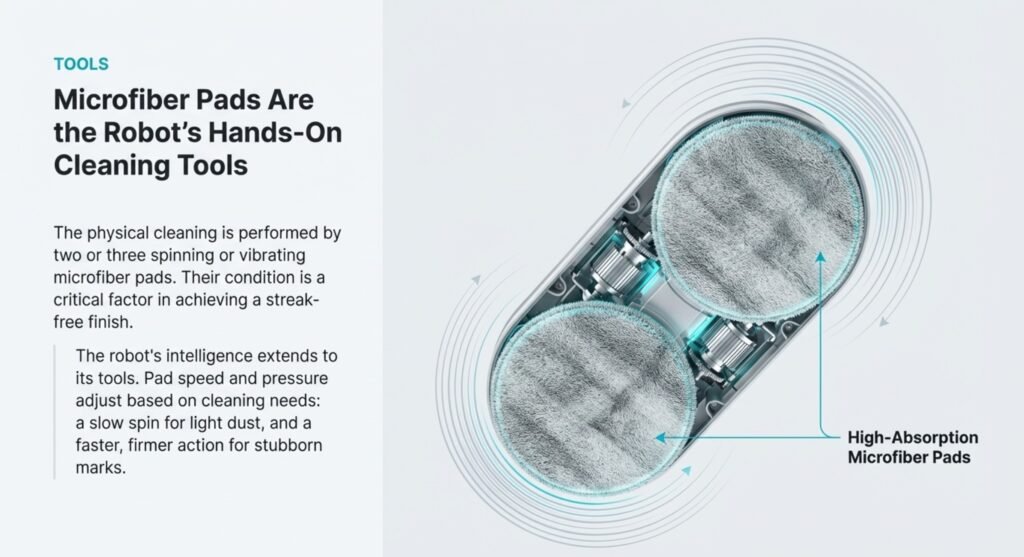
The robot uses microfiber pads underneath—it’s pretty simple. These pads spin or vibrate as the robot moves. Most robots have two or three pads working at once. When the pads are oversaturated or slightly dirty, the window cleaning robot streaks problem becomes almost guaranteed.
Some robots spray cleaner onto the window, while others need you to spray it first. A few have water tanks that drip out solution as they go.
Pad speed changes depending on how dirty things are. Light dust? Slow spin. Stubborn marks? Faster spin and more pressure. Usually, you’ll need to swap out the pads every 10–20 uses, once they start looking tired or stop soaking up dirt.
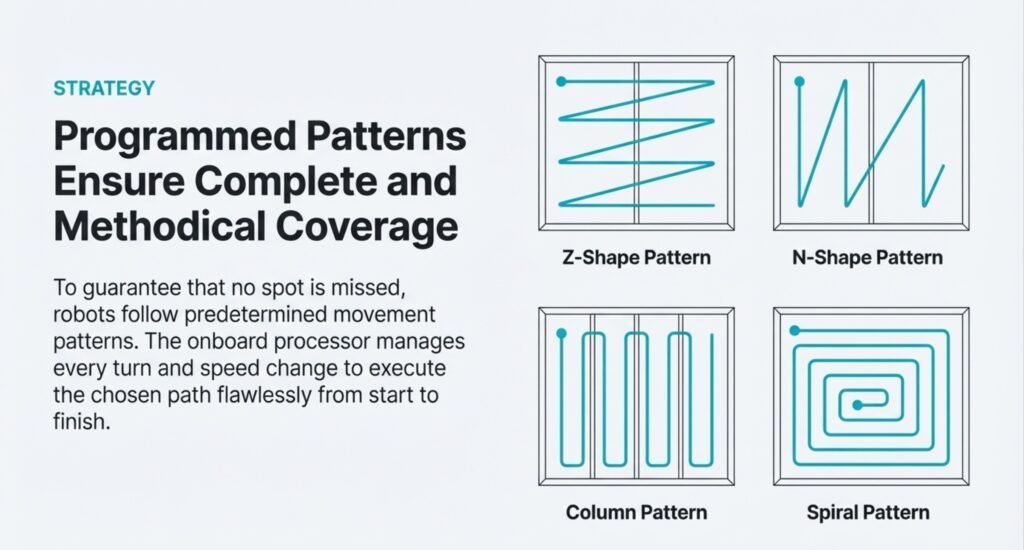
Movement Patterns That Can Leave Window Cleaning Robot Streaks
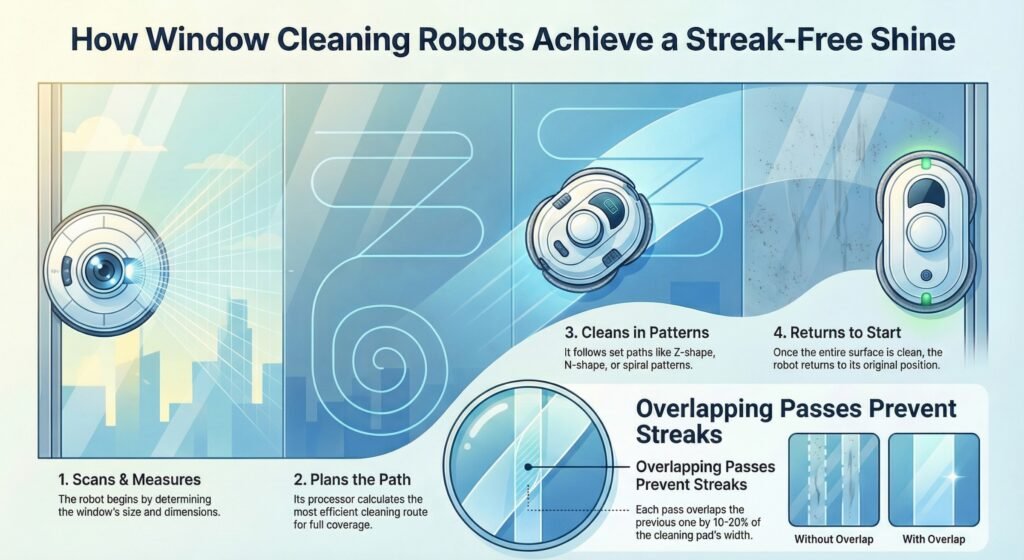
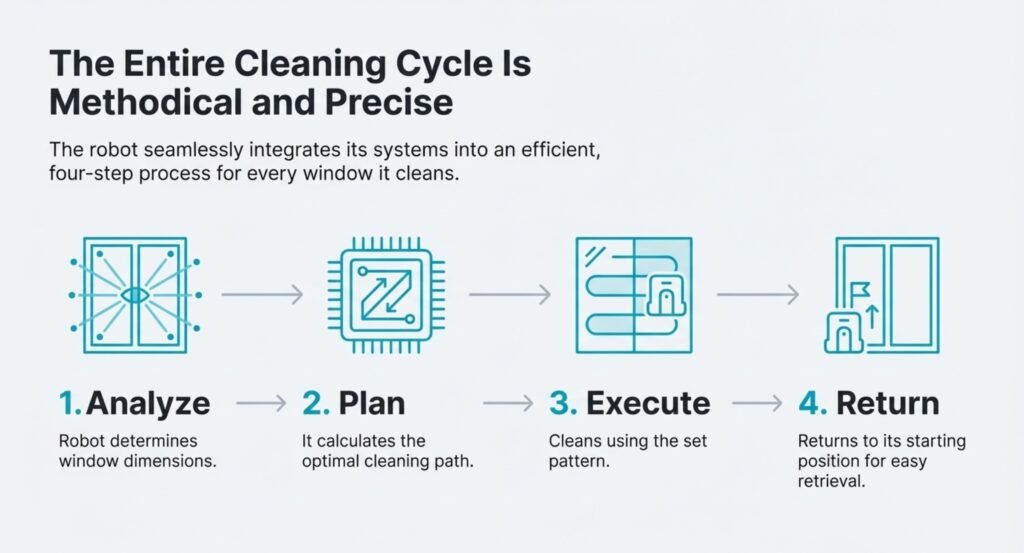
Robots follow set patterns so they don’t leave streaks or miss spots. The most common is a Z-shape or N-shape, moving in overlapping rows. This helps make sure every bit gets cleaned more than once.
Some models spiral in from the edges, others go up and down in columns. The robot’s processor handles all the turns and speed changes so there’s enough overlap.
Usual movement steps:
- Robot figures out window size
- Plans its path
- Cleans using a set pattern
- Returns to where it started
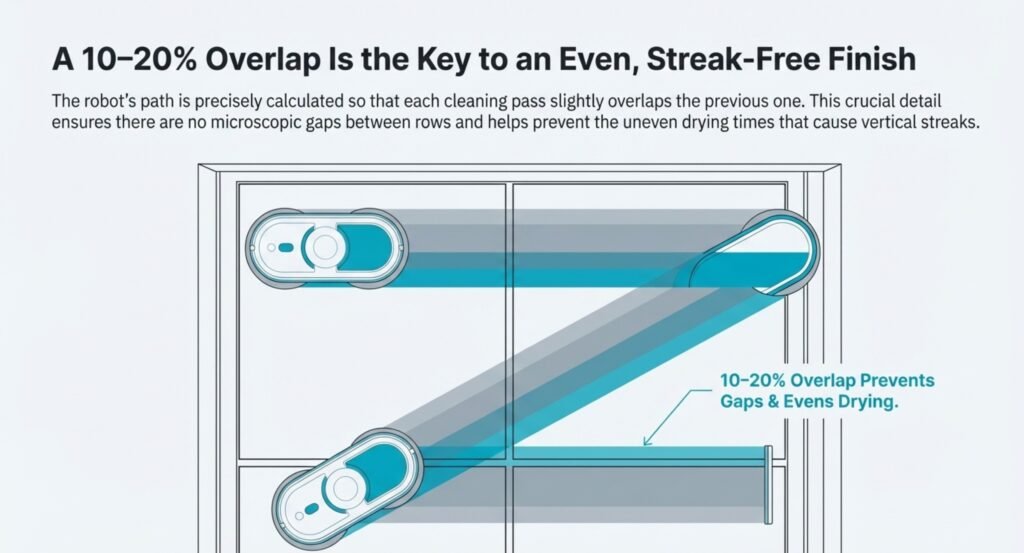
Each pass usually overlaps the last by 10–20% of the pad’s width. That extra coverage is what helps prevent streaks from different drying times.
Step-by-Step Window Cleaning Robot Streaks Fix
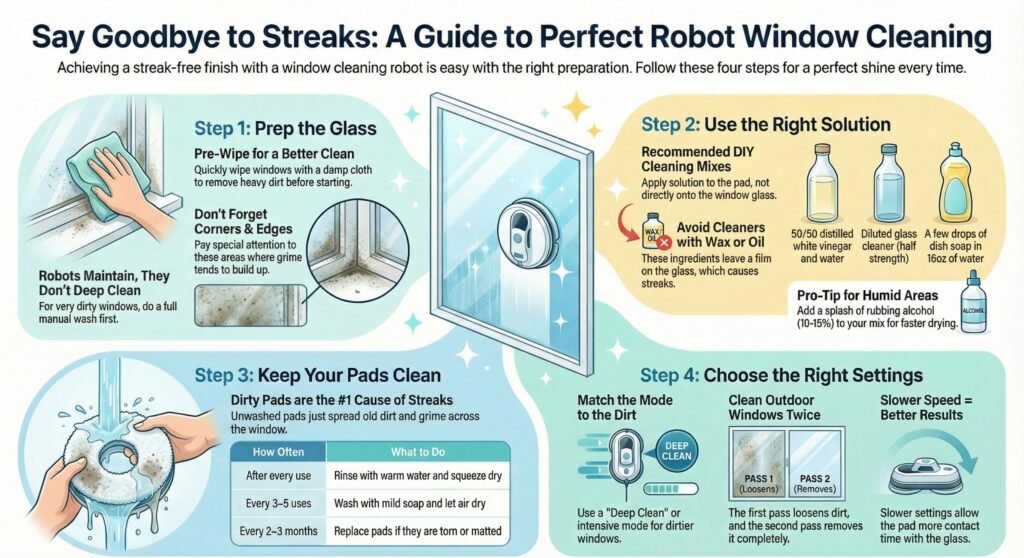
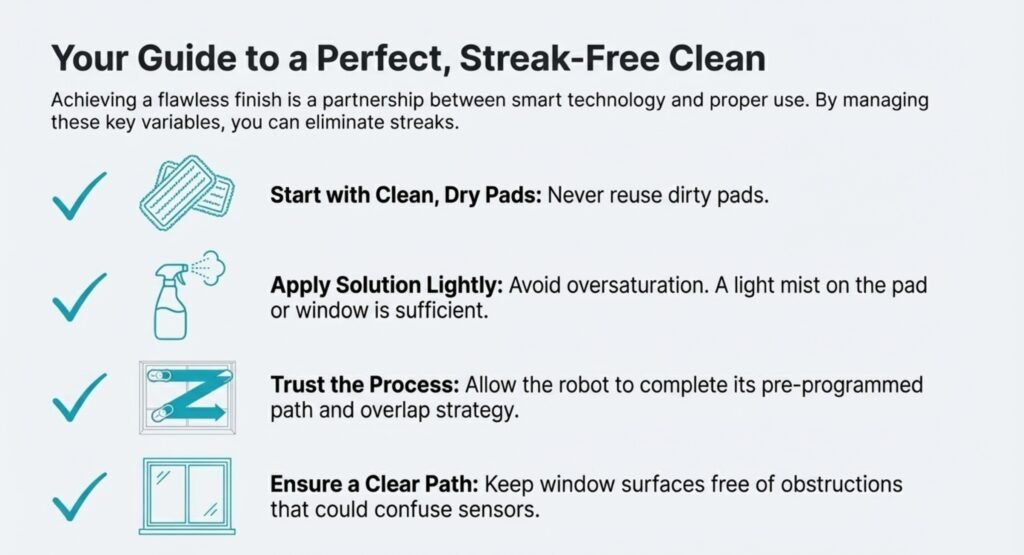
To avoid streaks, you need to prep the glass, use the right cleaner, keep pads clean and damp, and pick the right robot settings for your windows.
Pre-Cleaning the Glass to Stop Window Cleaning Robot Smears
Robots work best on glass that’s already free of heavy dirt, bird mess, or sticky stuff. Give the window a quick wipe with a damp cloth or squeegee before you start. This gets rid of bigger junk that could get caught under the pad and cause streaks.
Don’t forget the corners and edges—dirt piles up there. A fast pre-clean takes just a couple of minutes per window, but it really helps.
If your windows haven’t been cleaned in ages, do a full manual wash first. These robots are for keeping windows clean, not tackling months of grime.
Best Window Cleaning Robot Streaks Solution That Does Not Leave Residue
Just plain water doesn’t always cut it. It won’t break down grease or sticky stuff. Most robots work better with a little cleaning solution on the pad or in the spray bottle.
Good cleaning mixes:
- Half distilled white vinegar, half water
- Glass cleaner, diluted to half strength
- A couple drops of dish soap in 16 oz of water
- Distilled water for hard water areas
Skip cleaners with wax or oil—they leave a film and cause streaks. Put the solution on the pad, not all over the window.
If you live somewhere humid, add a splash of rubbing alcohol (10–15%) to help things dry faster and stop water spots.
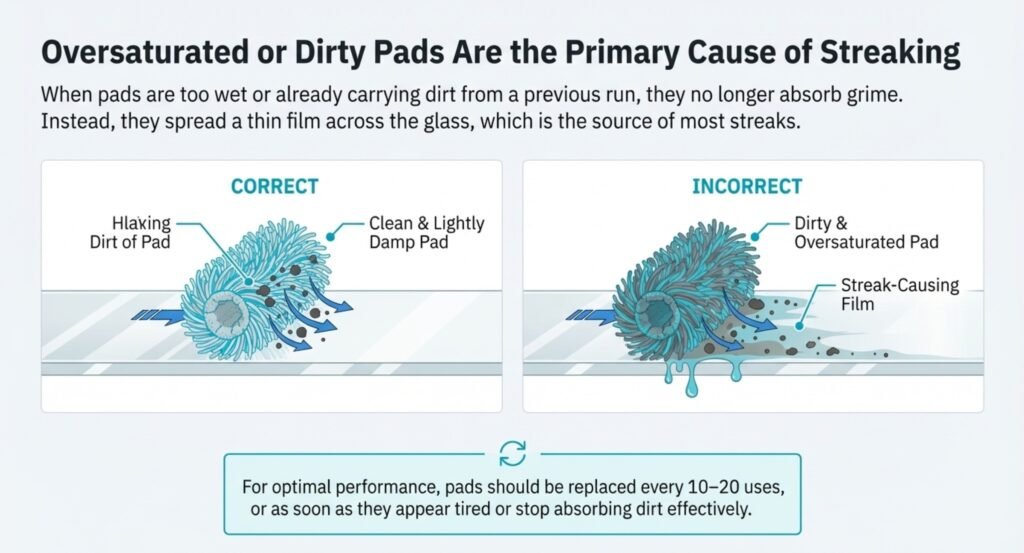
Why Dirty Pads Are the Top Cause of Window Cleaning Robot Streaks
Dirty or old pads are the #1 reason for streaks. Pads pick up dust, grease, and all sorts of gunk every time. If you don’t wash them, you’re just moving dirt around. This is the most common reason the window cleaning robot streaks problem repeats even after multiple runs.
Pad care schedule:
| How Often | What to Do |
|---|---|
| After every use | Rinse pad in warm water and squeeze it out |
| Every 3–5 uses | Wash with mild soap, air dry |
| Every 2–3 months | Swap out pad if it’s matted or torn |
Never put microfiber pads in the dryer—heat ruins them. Keep a spare pad handy so you always have a dry one ready.
Always check the pad before cleaning. If it feels stiff or crusty, wash it—even if you haven’t used it much yet.
Robot Settings That Help Fix Window Cleaning Robot Streaks
Most window cleaning robots come with a few different modes or speed settings. If you pick the wrong one for your window’s condition, you’ll probably end up with streaks. Light dust? That needs a whole different approach than windows caked in grime.
For windows that just have a bit of dust, one pass at regular speed is usually all you need. If there’s more buildup, switch to deep clean or intensive mode. Those settings make the robot go over the same spot a few times.
Outdoor windows are a bit trickier. They usually need to be cleaned twice. The first round loosens up the dirt, and the second pass actually gets rid of it. Sure, running the robot twice takes longer, but it’s the best way to avoid streaks.
Speed plays a role too. Slower speeds give the cleaning pad more time to make contact with the glass, and honestly, the results are just better. If you’re fighting stubborn streaks, try using automated workflows that slow the robot down and program a few passes in a row.
Common Mistakes That Make a Window Cleaning Robot Leave Streaks
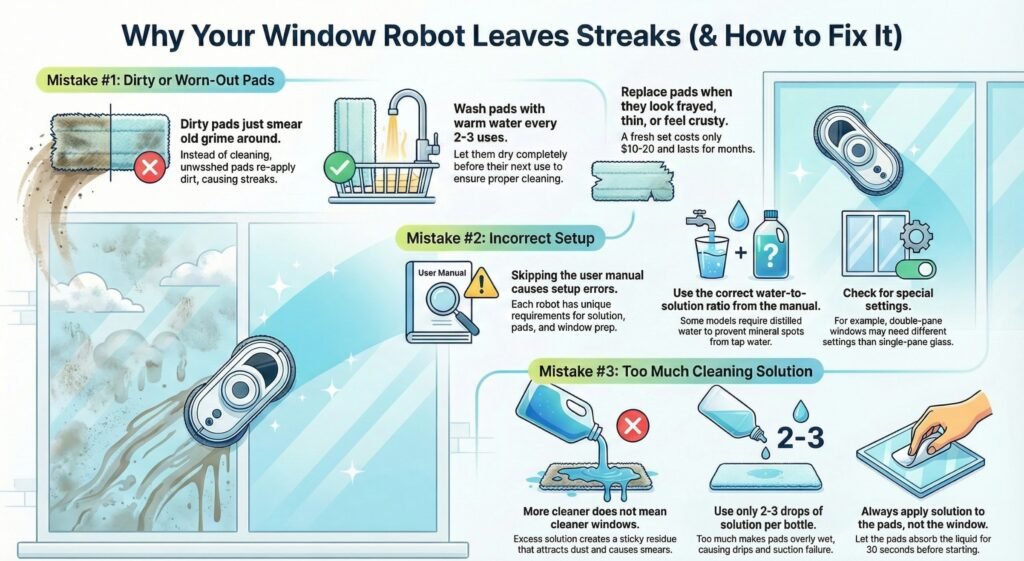
Lots of new users get frustrated with window cleaning robot streaks because they skip easy maintenance or use the wrong stuff. Three main mistakes cause most of the problems: dirty pads, ignoring the device’s directions, and using too much cleaning solution.
How Worn Pads Cause Window Cleaning Robot Streaks After Cleaning
The cleaning pads pick up dust and grime every time you use them. If you don’t clean or swap them out often, the robot just smears old dirt around instead of cleaning it up.
Most robots need their pads washed every 2-3 uses. Just rinse them with warm water and let them dry all the way before the next cleaning. If the pads look frayed or thin, they won’t clean well.
How to tell if a pad needs to go:
- Tears or holes you can see
- Threads coming loose on the edges
- Fabric feels stiff or crusty
- Streaks won’t go away, even after washing
People sometimes try to make pads last forever to save a few bucks. But then they end up running the robot over and over to fix streaks the old pads caused. Fresh pads cost about $10-20 for a set and, with regular use, last a couple of months.
Setup Mistakes That Worsen the Window Cleaning Robot Streaks Problem
Each robot has its own needs for cleaning solution, pad setup, and prepping the window. If you treat every robot the same, you’re asking for trouble. Small setup misses—like not priming pads evenly—often trigger the window cleaning robot streaks problem right away.
The manual tells you the right water-to-solution ratio. If you don’t follow it, the robot might not move right or clean well. Some models need distilled water because tap water can leave spots from minerals.
It’s easy to make classic smart home mistakes and skip the setup guide. That’s where you miss things like priming the pads before the first use, or changing pressure settings for different windows. Double-pane windows, for example, need different settings than single-pane glass.
The manual also shows you how to attach everything. If you mess up the safety tether or power cord, the robot might get stuck or leave spots uncleaned.
Why Too Much Solution Makes Window Cleaning Robot Smears Worse
More cleaner doesn’t mean cleaner windows. Too much soap just makes foam the robot can’t handle, and you’ll end up with sticky residue that grabs dust.
Usually, you only need 2-3 drops of solution per spray bottle of water. Some folks dump in 10-15 drops, hoping it’ll work better, but it just leaves a film that shows up as streaks in the light.
Too much solution also makes the pads too wet. Water will drip down the window faster than the robot can keep up, leaving vertical streaks. If the surface gets too wet, the robot’s suction can even fail.
How to use solution the right way:
- Stick to the measurements in the manual
- Only use solutions made for these robots
- Put solution on the pads, not straight onto the window
- Let the pads soak up the liquid for about 30 seconds before starting
Honestly, plain water is fine for regular cleaning. Save the cleaning solution for really dirty windows or outdoor grime.
Limitations Where Window Cleaning Robot Streaks May Still Happen
Window cleaning robots can be great, but they’ve got some real limits. They don’t work well on every window, can’t handle heavy grime, and need regular care to keep running smoothly. Even with good habits, the window cleaning robot streaks problem can still happen on textured glass, heavy grime, or hard-water buildup.
Window Types That Increase Window Cleaning Robot Streaks
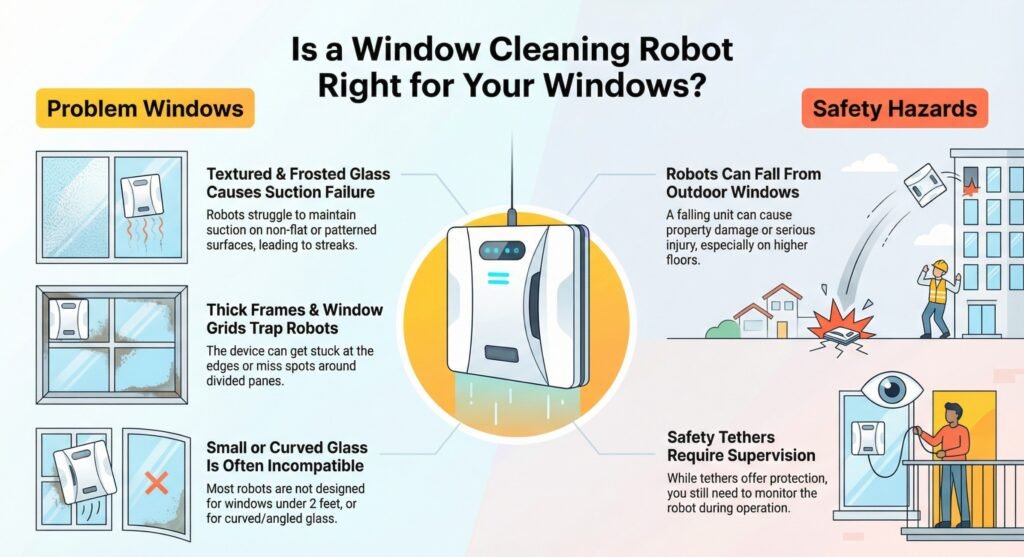
These robots are best on flat, frameless glass. They don’t do well on textured glass, frosted windows, or anything with a pattern because the suction doesn’t hold up.
Thick frames or divided panes are also a headache. The robot can get stuck at the edges or miss spots. Some models can’t get around window grids at all, so you’ll see streaks where it couldn’t reach.
Problem windows:
- Textured or frosted glass
- Windows with thick frames
- Multi-pane windows with grids
- Really small windows (under 2 feet)
- Curved or angled glass
Outdoor windows on higher floors can be risky. If the robot falls, it might break something—or worse, hurt someone. Most models come with safety tethers, but you still need to keep an eye on them while they work.
Heavy Dirt Situations That Cause Window Cleaning Robot Streaks
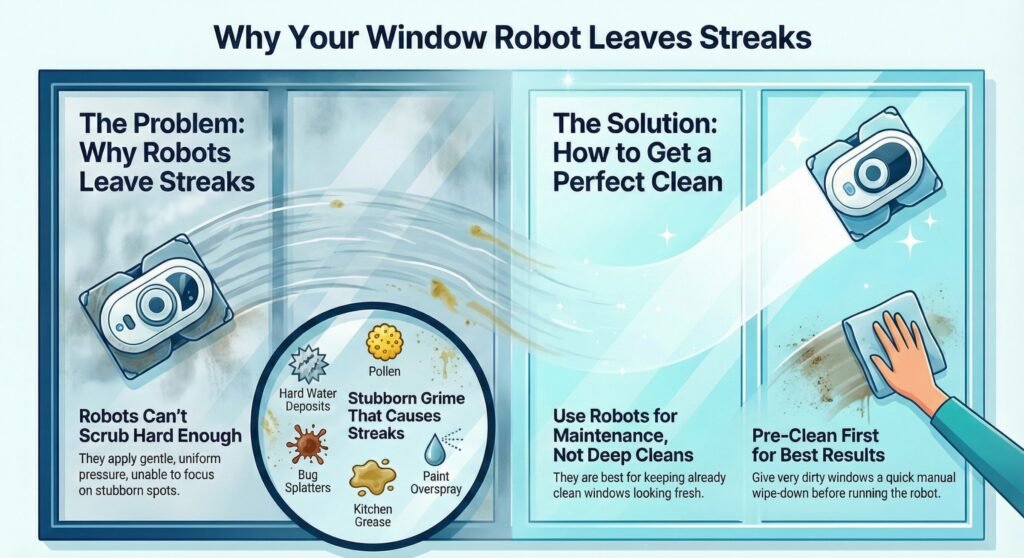
Robots handle light dust and fingerprints just fine. But thick dirt, bird poop, tree sap, or hard water spots usually stick around, leaving streaks.
The pads just don’t push hard enough to scrub out stubborn stuff. A person can apply more pressure and focus on tough areas, but robots use the same gentle touch everywhere.
Stuff that causes streaks:
- Hard water deposits
- Pollen stuck to the glass
- Bug splatters
- Kitchen grease
- Paint overspray
If your windows are really dirty, give them a quick hand clean first. The robot is better for keeping things clean between deep scrubs, not for tackling big messes on its own.
Maintenance Steps to Prevent Recurring Window Cleaning Robot Streaks
Cleaning pads pick up dirt fast and honestly, you’ll need to wash them after just a few uses. If you don’t, dirty pads end up smearing grime around instead of actually cleaning—which just leads to more drawbacks of smart homes like streaky windows. Not exactly what anyone wants.
Water tanks run out pretty quickly, so you’ll be refilling them and adding more cleaning solution pretty often. Suction cups? They need a quick check every now and then for cracks or damage. If they’re worn out, the robot loses its grip and doesn’t clean as well.
Maintenance tasks include:
- Washing the microfiber pads after each use
- Looking over the suction cups for any cracks
- Cleaning off the sensors and wheels
- Emptying out dirty water tanks
- Swapping out worn parts every 3-6 months
Battery life is another thing—it drops over time. When these robots are new, you might get 20-30 minutes per charge, but after a year or so, it’s usually down to 15-20 minutes. You’ll have to plan for charging breaks between cleaning sessions, which, honestly, just adds to the limitations of smart home automation.
If you’re still seeing marks, don’t assume the robot is failing. In most homes, the window cleaning robot streaks problem is fixed by (1) washing or swapping pads, (2) using a lighter mix, and (3) doing a quick pre-wipe on dusty glass. Once that’s dialed in, you’ll get consistent, streak-free results with far less effort.
Conclusion: Stop Streaks Fast, Then Pick a Robot That Makes It Hard to Mess Up

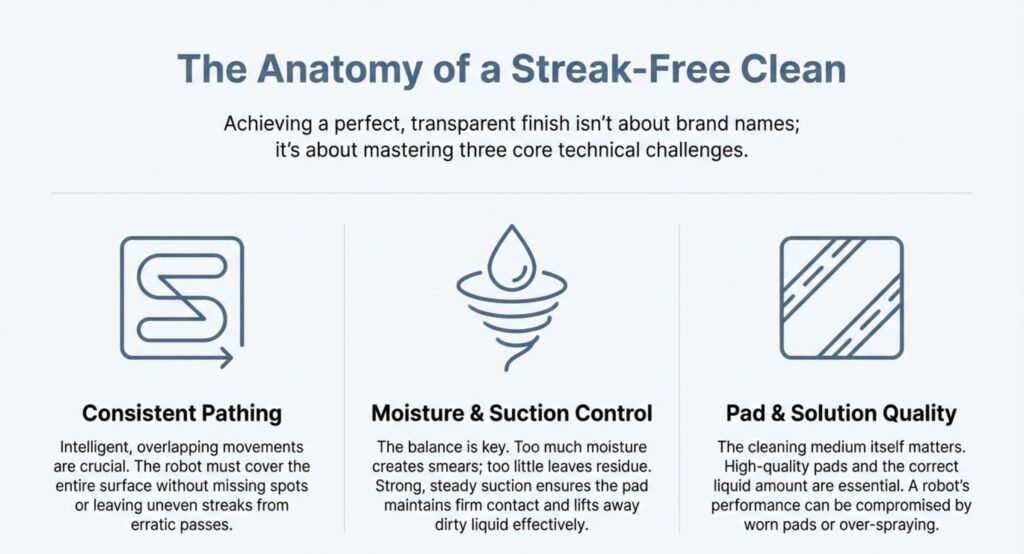
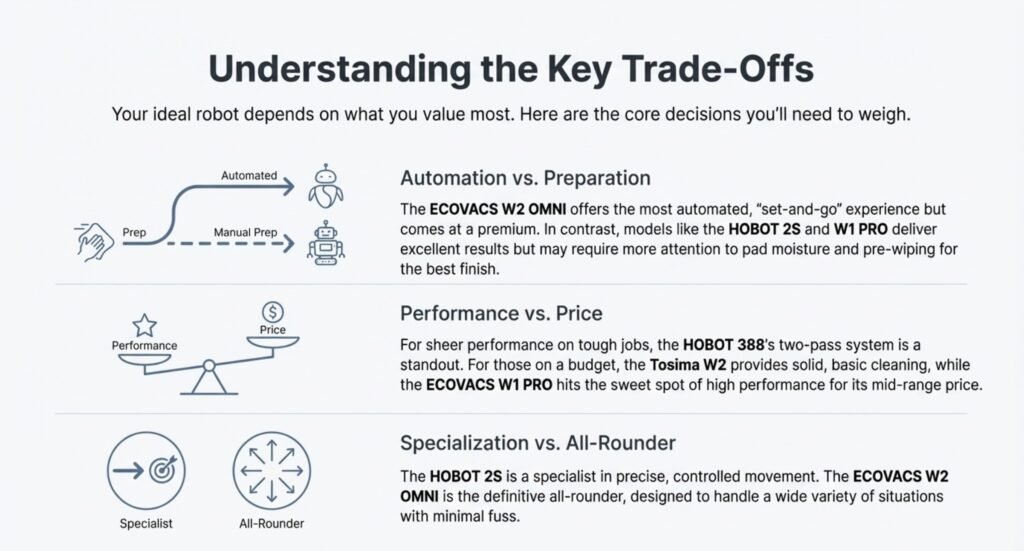
Most streak issues come down to the same few causes: pads that aren’t truly clean, too much liquid, and uneven contact on the glass. Once you follow the quick setup routine (pre-wipe, lighter mix, fresh pads), the window cleaning robot streaks problem usually disappears on the next run.
If you’re shopping for a model that’s more forgiving (better pathing, steadier suction, more consistent pad pressure), use the comparison guide below. These picks prioritize stable cleaning patterns, good pad contact, and easy maintenance—the real “anti-streak” trio.
Note: Features can vary by exact version/seller listing. Double-check the product page before buying.


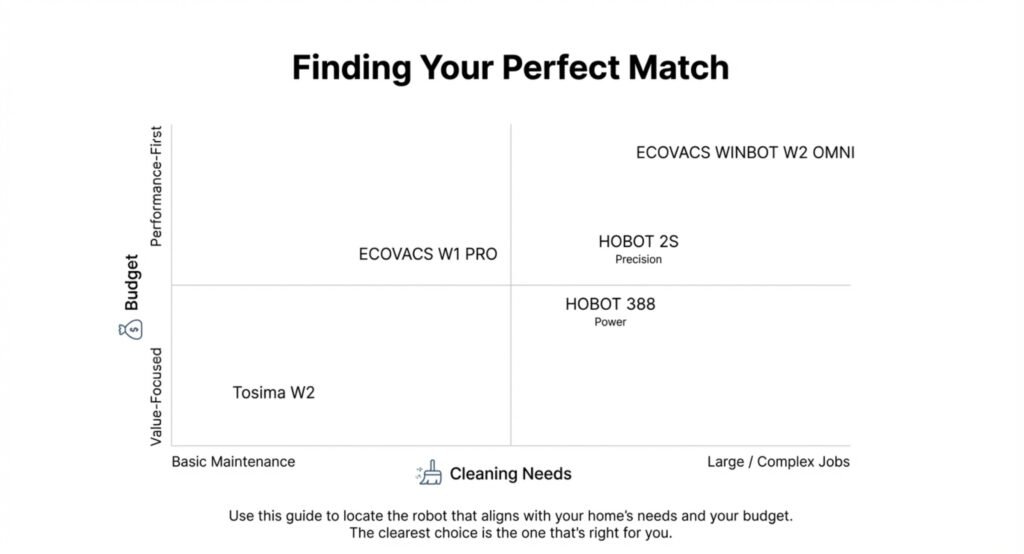
These options are chosen for streak-reduction factors: consistent pathing, steady suction/contact, and easy pad maintenance. Replace the links with your Amazon affiliate URLs.
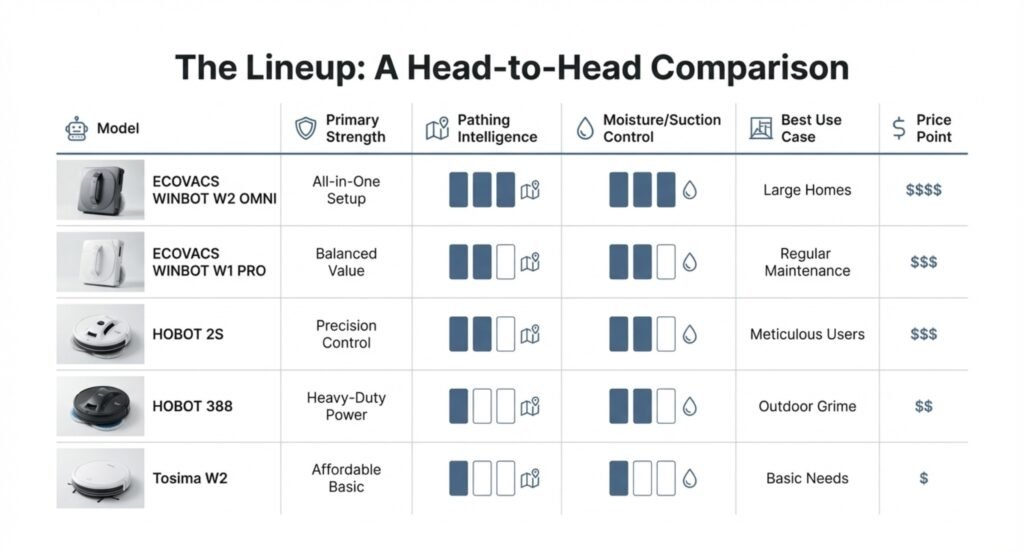
| Model | Key Characteristics (Anti-Streak) | Best For | Connectivity Performance | Pros & Cons | Link |
|---|---|---|---|---|---|
|
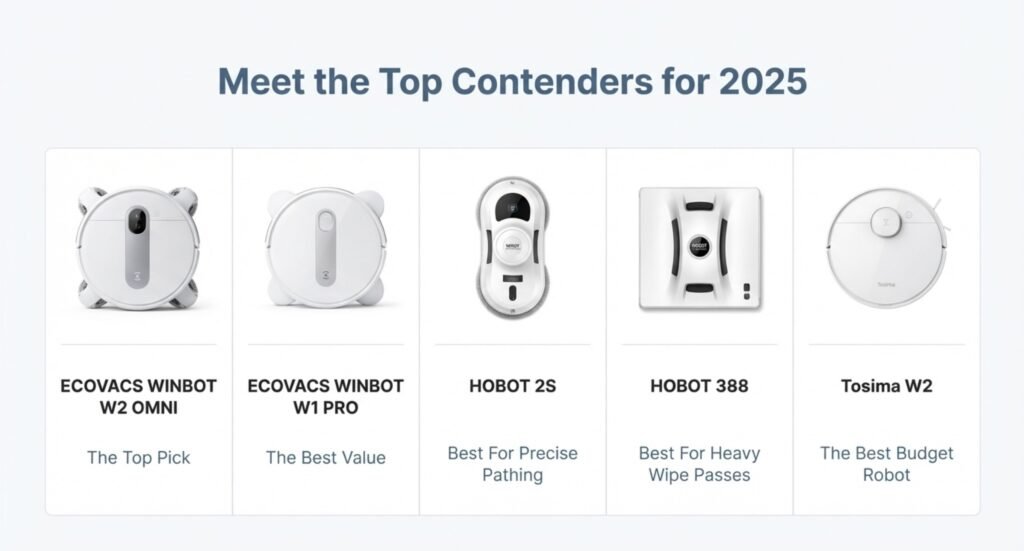
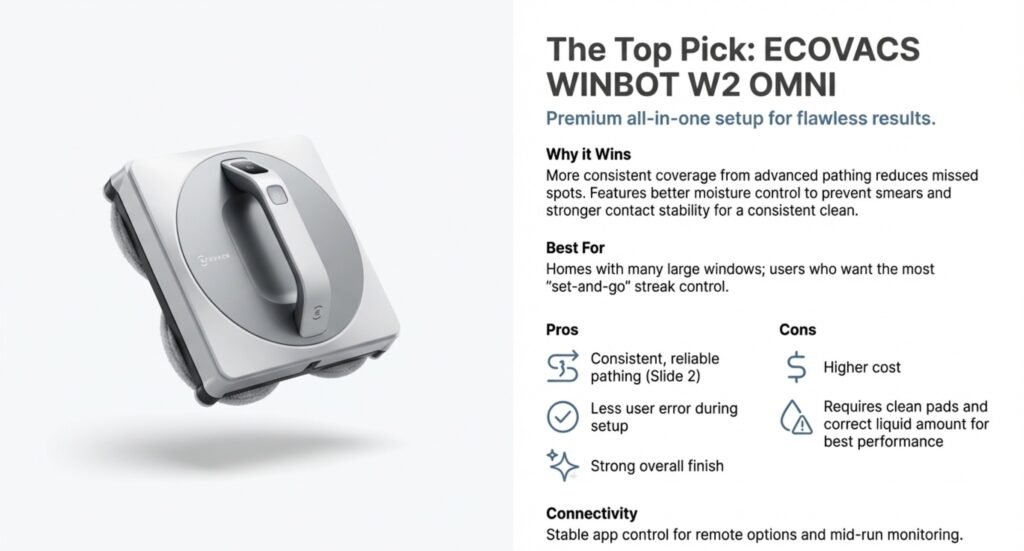
Top Pick ECOVACS WINBOT W2 OMNI Premium all-in-one setup |
|
Homes with many large windows; users who want the most “set-and-go” streak control. |
App control + stable remote options (good for monitoring mid-run). Tip: Keep the battery charged for consistent suction/contact. |
|
Check Price On Amazon |
|
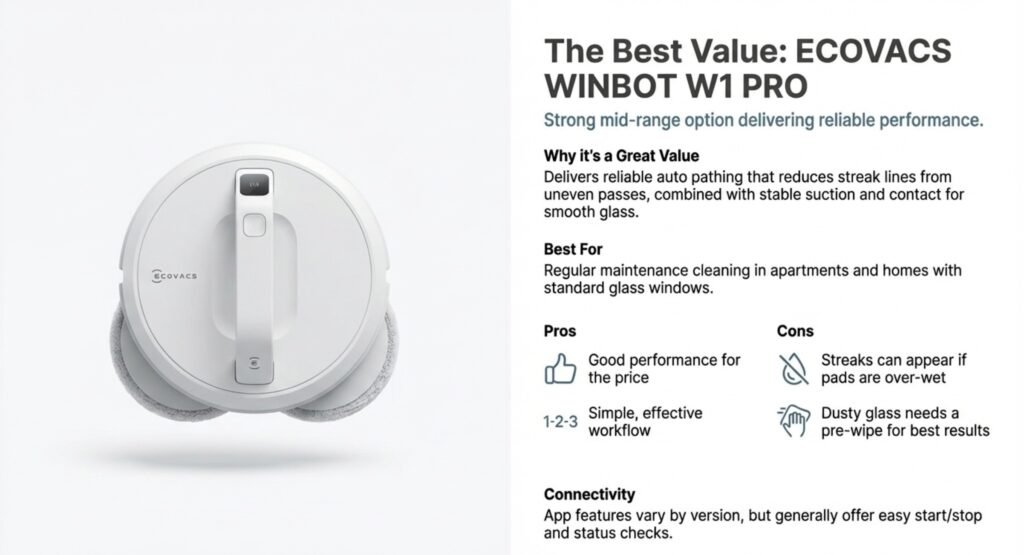
Best Value ECOVACS WINBOT W1 PRO Strong mid-range option |
|
Regular maintenance cleaning; apartments and homes with standard glass windows. | App features vary by listing/version; generally easy start/stop and status checks. |
|
Check Price On Amazon |
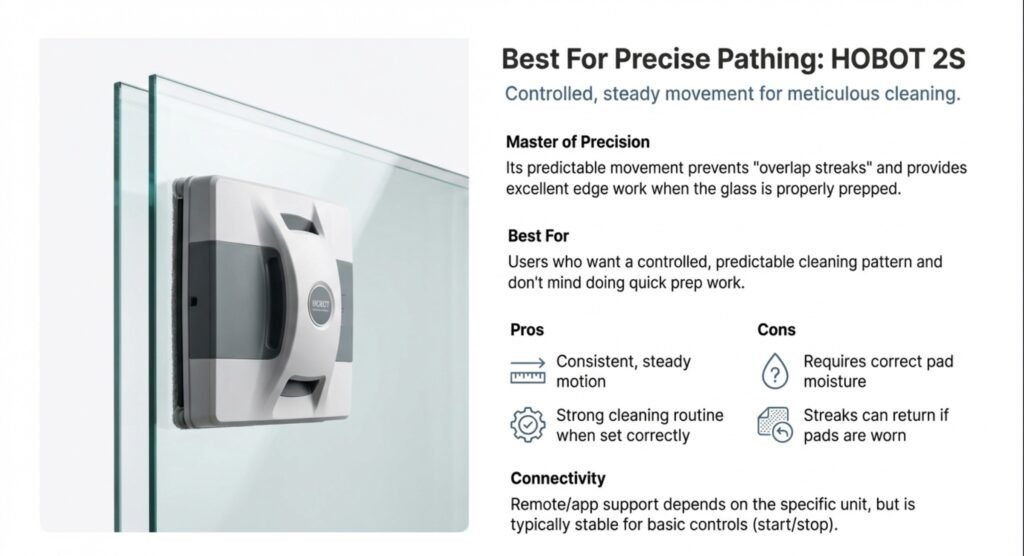
|
Best For Precise Pathing HOBOT 2S Controlled, steady movement |
|
Users who want a controlled cleaning pattern and don’t mind doing quick prep. | Remote/app support depends on unit; typically stable for basic controls. |
|
Check Price On Amazon |
|
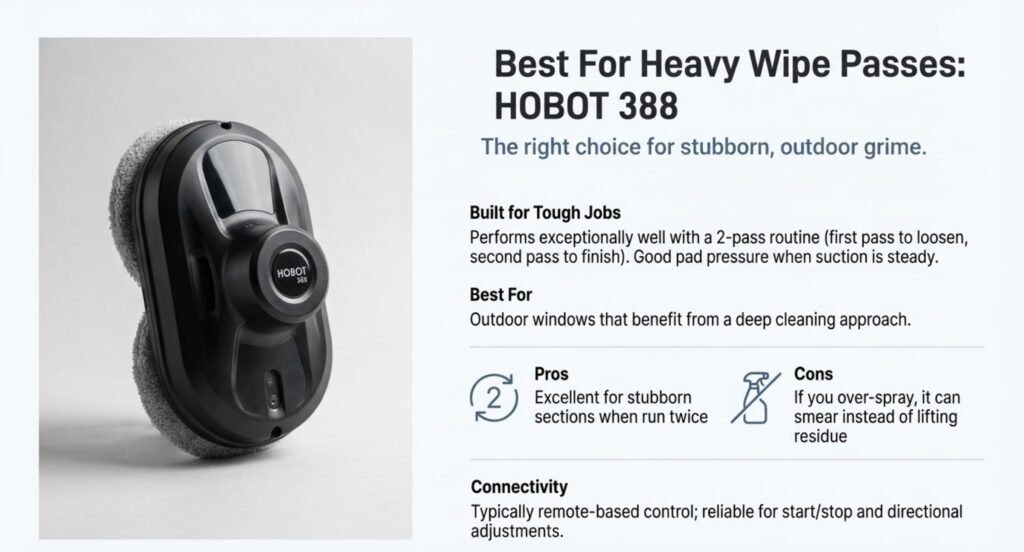
Best For Heavy Wipe Passes HOBOT 388 Good for repeat passes |
|
Outdoor windows that benefit from “first pass + second pass” cleaning. | Typically remote-based control; reliable for start/stop and directional adjustments. |
|
Check Price On Amazon |
|
Best Budget Robot Tosima W2 Window Cleaning Robot Affordable, solid basic cleaner |
|
Budget-minded buyers and basic needs | Remote control with basic settings |
|
Check Price On Amazon |
Frequently Asked Questions About Window Cleaning Robot Streaks
Why does my window cleaning robot leave streaks after cleaning?
A window cleaning robot usually leaves streaks when the pads are dirty or too wet, the glass wasn’t pre-cleaned, or the cleaning solution leaves residue. In most cases, it’s a setup or maintenance issue rather than a problem with the robot itself.
What is the most common cause of the window cleaning robot streaks problem?
The most common cause of the window cleaning robot streaks problem is dirty or worn microfiber pads. When pads aren’t cleaned regularly, they spread old dirt and moisture instead of removing it, which leads to visible smears on the glass.
How can I fix window cleaning robot streaks quickly?
The fastest window cleaning robot streaks fix is to rinse or replace the pads, use a lighter cleaning solution, and wipe the glass once before starting. These three steps solve most streak issues in a single run.
Can too much cleaning solution cause streaks on the glass?
Yes. Overusing cleaning solution is a common reason a window cleaning robot smears on glass. Too much liquid creates residue and uneven drying, which leads to streaks instead of clear windows.
Does hard water affect window cleaning robot results?
Hard water can cause mineral residue that leads to streaks after cleaning. Using distilled water or a mild vinegar-based mix helps prevent chalky marks and improves overall results.
Are window cleaning robot pads causing streaks even if they look clean?
Yes. Even if pads look fine, they can still hold residue or lose absorbency over time. If streaks keep appearing after cleaning, replacing the pads is often the simplest solution.
Should I run the robot twice if streaks remain?
Running the robot twice can help in some situations. The first pass loosens dirt, while the second pass removes leftover moisture and residue. This works best when dealing with light grime or window cleaning robot streaks after cleaning outdoor glass.
Do window cleaning robots work on all window types without streaks?
No. Textured, frosted, very small, or multi-pane windows can increase the chance of streaks. Flat, smooth glass delivers the most consistent results with fewer streak issues.